And The Oscar Goes To….Oscar Cupcakes!

Posted on

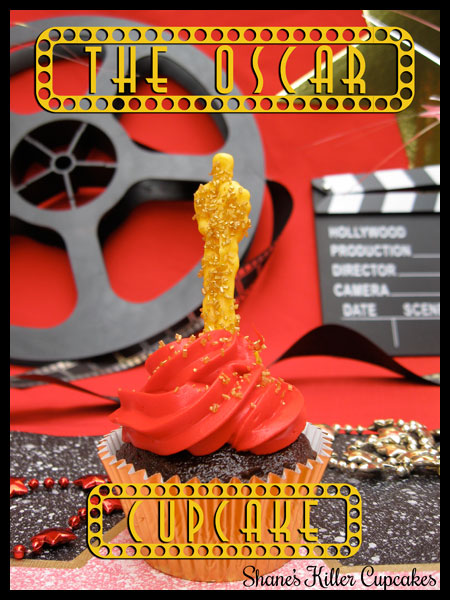
Sorry this is up a little late considering the Academy Awards are over by now, but here is what I made for an Oscar party I went to tonight. I got the idea the other day from a post over on Hoosier Homemade. I couldn’t see their pictures up close very well but I think I did a decent job recreating them. Luckily I threw a Hollywood costume party last year and had a ton of decorations left over for the photo shoot set-up.

For the cake part, I used the chocolate cake recipe from this post that I shared with you last month. I’ve been so tired of making buttercream icing lately that I chose to make some cream cheese frosting this time. I used this recipe but had to alter it a little bit. If made as instructed in that recipe, it has a very strong cream cheese flavor. For some things like a carrot cake that might work, but I wanted something that was a little sweeter, so I added at least another cup of powdered sugar to the called-for two.  If I made it again I might even add a little more powdered sugar. The flavor was still pretty strong but it did taste good.

The Oscar statue toppers are made of yellow melting candy that I drew out on some wax paper. To make it easier for drawing, print out this template (PDF) and put it under the wax paper on a cookie sheet. Fill in the black area with the candy melts. Then sprinkle it with gold sugar sprinkles. Harden them up in the fridge for a bit and then they can be shoved into the top of the frosting at the end.

I used a #1M tip to pipe the frosting. If you don’t have frosting bags, get some heavy duty freezer ziplock bags, cut a corner out and shove the frosting tip through it from the inside out. Don’t cut the hole too big or the tip will go all the way through. Then heap the frosting inside the bag and push it down to the opening. Put more of the gold sprinkles on the top of the frosting too.

The Oscars go for a little stroll on the Hollywood Walk of Fame

Did you watch the Academy Awards this year? How did you like it? I felt there was a lot of stuff that could have been cut out and I was disappointed that they didn’t let the Best Original Song nominees perform. I was looking forward to seeing the Muppets perform “Man or Muppet.” I’m glad it won though. What were some of your favorite and least favorite moments?

Pin It
Grand Opening: A Piece of Cake Bakery

Posted on

Photo credit: A Piece of Cake

Get ready Salinas, CA! A Piece of Cake is opening their first stationary storefront tomorrow! If you’re from California’s Central Coast, you might recognize A Piece of Cake from their cool mobile cupcake truck that travels around Salinas throughout the day, and starting tomorrow you can also find them at a permanent location located in South Salinas.

Don’t worry, the truck will still be making its way around Salinas, but for those of you who don’t have time to track it down, now you have a convenient location to find delicious cupcakes right across from the Savemart on South Main.

A Piece of Cake has many things planned for the grand opening. They will be having hourly ticket raffles and a cupcake eating contest!

Cupcake Eating Contest:

Begins at 2pm. Get there before 2pm to enter. You must be present to win. Winner will receive $100!

Hourly Drawings:

Every person who visits tomorrow will get a ticket for the raffles. You don’t have to be present to win this one.

Tomorrow’s Menu:

Cupcakes:

  • Oreo
  • Peanut Buttercup
  • Strawberry Lemonade
  • Red Velvet
  • Chocolate Chocolate
  • Birthday Cream Filled
  • Rocky Road

Other items

  • Chocolate Chip Cookies
  • Sugar Cookie Sandwiches
  • Bundt Cakes
  • Coffee
  • Bubble Tea

A Piece of Cake Grand Opening

Saturday, February 25, 2012

Grand Opening Hours: 10:30am-7:00pm

1165 South Main St., Salinas, CA 93901

831-682-2683

Email     Website     Facebook     Twitter

I might be able to stop by tomorrow and I’ll make sure to take pictures of all the festivities. Let me know if you go to the grand opening!


Who Wants Some Money? $25 Paypal Giveaway!

Posted on

Fellow blogger, Giveaway and Glitter, graciously included me on her giveaway this week so I figured I would help her out by sharing her current giveaway with you guys! Plus, who doesn’t want to try to win some money?

TO ENTER:

Click over to Giveaways and Glitter to enter her February Fun Cash Giveaway! One person who enters will win $25 cash through Paypal or a $25 GC of their choice. Contest will end on February 29, 2012 at 12:01 AM EST. This contest is open to people World Wide. Winner will have 48 hours to reply to winning email or a new winner will be chosen.


Chocolate-Dipped Brownie Bars

Posted on

These are so easy to make and turned out very tasty. I went the easy way out and used Betty Crocker’s Dark Chocolate Premium Brownie Mix for this because I was too lazy to find a recipe. Sue me.

All you need for these are brownies (either from mix or your favorite recipe), melted chocolate (I used Baker’s semi-sweet baking chocolate), and Valentine sprinkles. That’s it!

Cool surprise: My pink sanding sugar looked like iridescent sparkles on the chocolate!

Make the brownies according to the box or your recipe, let them cool completely, and then cut them into bar shapes. Melt some chocolate in a mug so that you don’t have to melt too much but still have enough depth to dip the bars in. Then dip them and place the brownies on a cookie sheet covered with wax paper. Add sprinkles and colored sugars to the chocolate and chill in the fridge until the chocolate sets up.

Now they are ready to be scarfed down!

What are your favorite Valentine desserts? Do you like easy recipes or ones you have to put a lot of effort into?

Pin It

Valentine Pancakes {Recipe}

Posted on

This pancake recipe has been passed down in my family since my great grandmother, Bubba, and over time has changed a little bit. This weekend my Mom and I decided to try modifying them for Valentine’s Day by coloring them pink and red and shaping them into hearts on the griddle. They turned out ok, but I’d probably just keep them regular next time, you’ll see why.

After making the batter, my first attempt to heart shaping was using heart cookie cutters. I sprayed them with cooking spray and put the batter in. Even still, the pancakes stuck to the cookie cutters a bit and so I scrapped that idea, even though the pancakes themselves didn’t look too bad.

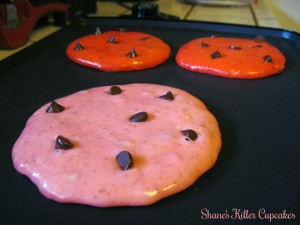
Then I tried to shape them myself by pouring the batter out in heart shapes. They started to look a little wonky, but I liked their unusual character. Eventually, I just gave up on odd shapes and made round pancakes. As you can see, I like chocolate chips in my pancakes. It’s a requirement when I eat them but this is just an option.

The end result was pretty cute. Of course they got a little darker after being cooked but the colors on the inside were still pretty vibrant. Here are the directions for the pancakes. To make them regular, don’t add the food coloring.

{Recipe}

Bubba’s Pancakes

INGREDIENTS:

  • 1 lrg. egg
  • 1 cup buttermilk
  • 2 tbs. sugar
  • 2 tbs. vegetable oil
  • 1 cup flour
  • 1 tsp. baking powder
  • 1/2 tsp. salt
  • just shy of a 1/2 tsp. of baking soda

(Optional)

  • 2 tbs. wheat bran
  • 1 tbs. wheat germ
  • chocolate chips
  • powdered sugar
  • butter
  • (For Valentine Pancakes: pink and red food coloring)

DIRECTIONS:

  1. I’m not sure what to tell you to turn your griddle or stove top to for heating the pancakes. On our griddle we set it to med.-high heat and that seems to work, but it’s up to you to figure out the right temperature for your personal stove and skillet or griddle.
  2. Whisk together the egg, buttermilk, sugar, and oil in a bowl and set aside.
  3. Then sift together the flour, baking powder, salt, and baking soda in another bowl. Pour the dry ingredients into the wet ingredients. If you want heartier pancakes sprinkle the bran and wheat germ on top of everything at this point.
  4. Stir the batter gently until all ingredients are combined but make sure the batter is still lumpy. If it becomes too thin, the pancakes will not rise when they cook. For the pink and red pancakes, I split the batter into two bowls and put a few drops of coloring in each. If you’re going to color them, make sure not to stir them too much before you put the food coloring in because you will have to stir them more to get the color you want. It’s a little tricky. For simplicity, just make them regular and skip the coloring on your first try at these.
  5. Once the batter is mixed but still lumpy, let it sit for about 5 minutes.
  6. Pour 1/3 cup of the batter onto your griddle or skillet for each pancake. If you like chocolate like I do, drop a few chocolate chips on to the pancake before you flip it over. You can also add other things at this point, such at nuts or apple slices, for example.
  7. When the batter starts to have little bubbles start popping up in it, it’s about time to flip it. The pancake is done cooking if you poke the middle and it bounces back fairly quickly.
  8. Butter the pancakes as soon as they are done and sift some powdered sugar on top. Or instead put some syrup on top. The garnishes and toppings are up to you.

Makes about 10-12 pancakes.


Come join #DairyBreakfastClub recipe party at TidyMom along with The California Milk Advisory Board and RealCaliforniaMilk.com

Pin It

New Blog Theme

Posted on

I’ve decide to give Shane’s Killer Cupcakes a new look. What do you think? I’m still playing around with things on this new hosting, but I’m pretty sure that SKC will be looking like this from now on (at least until I get bored of it!)

If you’re new here, leave me a comment and tell me how you found me. Do you have a blog? Let me know and I’ll check it out. Thanks!

Related Posts Plugin for WordPress, Blogger...