4th of July Flag Cupcake Picks {Free Printable}

Posted on

IMG_3444

I’m working on some cute cupcakes this week for 4th of July and thought I’d share with you the cupcake picks I’ve made to go on top of them. I created an American Flag toothpick printable for you so you can make your own flag picks for your 4th of July cupcakes.

If you can find the round toothpicks that have one flat end with grooves, those are the best for this project. The toothpicks I used are Dynamic brand round toothpicks in natural color. If you can’t picture the type of tooth picks I’m talking about refer to the image below:

IMG_3449Download the free printable here.

flagspdf

First download the printable at the above link then follow the “recipe” instructions below:

4th of July Flag Cupcake Picks How-to

Ingredients

  • Toothpicks
  • Color printer with paper
  • Scissors
  • Multi-purpose glue (white glue)

Instructions

  1. Print out the flag printable I've provided.
  2. Cut out each of the 24 flags.
  3. On the back of one of the flags, put a little glue in the center and stick the toothpick on it. If you want, you can leave a little of the stick hanging out of the top.
  4. Then put glue on the back of one half of the flag and press it together around the toothpick.
https://shaneskillercupcakes.com/2013/06/4th-of-july-flag-cupcake-picks-free-printable/

Have a fantastic 4th of July! I’ll be posting my 4th of July cupcakes sometime this week so keep an eye out for those.

Pin It

Etsy Store Spotlight Review: Claudine Hellmuth

Posted on
il_570xN.425756729_o5le

Photo credit: Claudine Hellmuth

The amazing artist, Claudine Hellmuth, sent me an adorable Retro Oven Cupcake Box from her Etsy store to review for the blog. I was more than excited. I’ve been a fan of her shop for a while and had fun putting this little box together. It is available as a .pdf file and you can print as many of these cuties as you want! The file has all five colors (Red, Pink, Yellow, Aqua, and Green) in it as well as some cute oven mit tags, a cupcake tray, and some editable cupcake flags that can be attached to toothpicks.

il_570xN.425568687_p69a

Photo credit: Claudine Hellmuth

The first thing I did when I got the file was print out the blue oven. You need card stock, scissors, glue or a tape roller, and a scoring device to make these. You will also need an exacto knife to cut out the circle in the cupcake tray, and if you want, the window on the front of the oven.

IMG_3348Although it was pretty easy to construct, there were a couple parts that got a little tricky. I’m sure if I made these regularly I’d get pretty quick, but for a first time, it took me about 20 minutes in all to get this put together. I’d suggest watching her instructional video in addition to reading the written directions, because she gives you a few tips that make it easier to build and some ideas to make it look cuter.

I think mine came out pretty good! I’d love to make the other colored ovens too. They’re just so cute.

IMG_3357One thing I liked about these is that the ovens are a bit tall. There is enough room for cupcakes with toppers or tall frosting. The ovens would even be great for other small items like bags of candy, gift cards, small presents, etc.

lotsofroomAnother great thing is the price. You get all 5 oven colors, 1 cupcake tray, 8 cupcake flags with editable text, and 4 oven mitt shaped gift tags for $4.99! And you can print as many ovens as you want! Claudine even sells a commercial license for a one time fee of $20 per favor box design if you want to sell your own baked goodies in them. That’s a great deal.

Make sure to check out her shop to see all of her other designs. Not only can you find several other adorable favor/treat box designs (like an ice cream truck), you’ll also find printable dolls, decorations, and digital scrapbooking sheets. Most of her designs range from $4.99-$5.99. So affordable and very high quality.

banner

Claudine Hellmuth is an artist and illustrator. She loves creating “quirky, retro-whimsical” artwork to license to the gift, home and craft markets. She’s been featured in The New York Times, appeared on The Martha Stewart Show, HGTV and The DIY Network, and in 2012, launched an exclusive paper crafting line with the Home Shopping Network.

If you like her designs, make sure to follow her on Facebook, Twitter, and her blog. Also don’t forget to visit her website and sign up for her newsletter! The newsletter includes free printables and alerts you to new items in her Etsy shop.

What’s your favorite item in her shop?


Pin It

Duff Goldman by Gartner Studios Review and Giveaway

Posted on

giveawayimageThe great folks at Gartner Studios sent me some Duff Goldman products this week to review. I was curious to try this brand after seeing some of his interesting products on the shelves at Michaels before. Have you ever watched Food Network’s Ace of Cakes? Duff Goldman is the baker and creator of that show! Duff Goldman by Gartner Studios is the bakeware and cake decorating product line that was created to bring his unique style of baking to your home.

Receiving these products was exciting for me because they are flavors I don’t usually work with. Here’s a run down of the products:

  • Duff Goldman by Gartner Studios Red Velvet Cake Mix – Duff’s premium cake mixes use low protein and low gluten flour, which makes for a lighter, fluffier cake.
  • Duff Goldman by Gartner Studios Raspberry Cake and Cupcake Filling – Add a flavorful, tasty center to cakes and cupcakes with Duff’s zingy new Raspberry filling. It’s extra delicious when paired with Buttercream or Cream Cheese frosting. Which brings me to the last product for review:
  • Duff Goldman by Gartner Studios Cream Cheese Ready to Serve Frosting – Reach for the most delicious, easily spreadable frosting available, from the Duff Goldman by Gartner Studios collection. Other delicious flavors include: Fudge, Chocolate, and White.

IMG_3329Over the years I’ve noticed a negative stigma attached to boxed cake mixes and pre-made baking products. I know that “from scratch” recipes usually turn out better quality products and allow for experimentation more easily, but boxed mixes have their place too! When my boyfriend and I were making these red velvet cupcakes this week, he commented how much easier and less of a hassle it was to use these Duff products than it was the last time he helped me make cupcakes from scratch. It really was a lot easier and created much less of a mess to clean up later too. That’s why I don’t look down on boxed mixes. They definitely have their place when you just want to make a quick batch of cupcakes without having to devote your whole afternoon to them.

The Duff red velvet cake mix was simple to mix together. All you needed was some water, eggs, and oil. The batter itself was a little thinner than I expected, but didn’t effect the final product negatively. In fact they were very light and airy while still having a density that made them hold up well. The batter had a lot of red dye in it though. So much so that it stained my skin! But it washed off fairly easily. I’m not sure how easily it would have washed out of clothing though, so that’s something to keep in mind. Look how red it was!

IMG_3335

The ready-to-use raspberry filling came in a sealed plastic bag, so I just snipped off a corner and squeezed it into the centers of the cupcakes after coring them out with a large frosting tip. Then I took the center part out of the frosting tip, cut off the excess cake and placed the top part back on the cupcake once I filled it. The filling is sweet and slightly tart. If you like really tart raspberry flavor you might find this a bit sweet, but it isn’t overpoweringly sweet. And it paired well with the cream cheese frosting flavor.

coringcupcakeThe cream cheese frosting was one of the best canned cream cheese frostings I’ve ever tasted. It was also sweeter than most homemade cream cheese frostings I’ve made. Its main draw back was that it was rather thin so it isn’t very good for piping tall frosting. Whipping it and maybe adding a little powdered sugar to it might help thicken it a bit, but it’s best for frosting with a spatula in a thin layer on top of the cake. These cupcakes didn’t need a lot of frosting though, because there was already so much flavor in them. The the slight cream cheese flavor definitely went well with the red velvet and raspberry flavors of this cupcake.

IMG_3342

Overall, I was very impressed with these products from Duff Goldman by Gartner Studios. I was worried they’d taste dull because they are a mass produced product, but surprisingly, they had a lot of flavor and nice consistency. I would definitely recommend these products to others, especially those who want quality cupcakes in a short amount of time.

IMG_3343

BUY IT

You can find these products at several stores including Michaels, select Walmart and Target stores, or online at www.duff.com.

CONNECT

Stay up-to-date on all things Duff Goldman by Gartner Studios! Follow on Facebook and Twitter.

WIN IT!

One lucky reader will win their own package of Duff products! The package will have the same items I reviewed above including the Red Velvet Premium Cake Mix, Raspberry Cake and Cupcake Filling, and Cream Cheese Ready to Serve Frosting.

Open to U.S. residents of all ages only. Giveaway ends 6/30/13 at 11:59 pm EST.

Click HERE for complete giveaway rules.

a Rafflecopter giveaway

****I received these products free of charge for an honest review of the products. I was not compensated monetarily for this review and all opinions are my own.****
Pin It

Peanut Butter and Jelly Cupcakes

Posted on

I’ve always loved peanut butter and jelly sandwiches so I decided I’d try making one as a cupcake. There are many recipes out there making different versions of this cupcake, but none were exactly what I wanted. For example, I’d see a cake recipe I liked but didn’t like the frosting that went with it or I didn’t like how the jelly was used in the cupcake, etc.

I knew from the start I wanted to use my favorite jam/jelly I get from IKEA. Made from lingonberries, it’s a perfect blend of sweet and tart. Lingonberries sort of tast like cranberries. This the same preserves IKEA uses in its Swedish meatball meal from their restaurant. For the peanut butter, I used Trader Joe’s natural peanut butter. The recipe I used for the cupcakes from Taste of Home uses the overly processed sweet peanut butter, like Jif or Skippy, but the natural peanut better worked just as well.

IMG_3112

When the cupcakes were done baking, they smelled like delicious peanut butter cookies. I put the jam in the middles of the cupcakes once they were done cooling. I used my #1 Wilton frosting tip (one of the large ones) to cut the holes out. Save the little piece of cupcake that you cut out of the center and cut off the top of it. This top will be put back onto the cupcake like a cap on top of the jam filling. To make the jelly or jam easier to spoon, slightly warm it in the microwave for 10-15 seconds. You don’t want it hot, just a little more runny so it will fill the hole nicely. This is especially good for jelly you pull out of the fridge.

IMG_3107

The frosting is super easy. This Quick Vanilla Buttercream Frosting from the Food Network is a good one for this recipe. If you want more peanut butter flavor you could use a peanut butter frosting like the one that accompanies the Taste of Home recipe above, but I think the cupcakes have plenty of peanut butter flavor on their own. I was only able to get about 15 cupcakes from the the recipe despite it being labeled as 18 servings. If you pile your frosting on like I did, make the whole recipe from Food network. If you only thinly frost the tops of the cupcakes, you could probably get away with only half a recipe.

Garnish the tops of the cupcake frosting with a little more jelly/jam. You might want to warm it up again for this, as it was much easier to drizzle the jelly when it was more liquid.

This was a very simple recipe to put together. I was happy to find that I already had all of the ingredients for this one in my kitchen which almost never happens! Now you can have PB&Js for lunch and dessert!

IMG_3113

Pin It

Chocolate Stout Cupcakes with Whiskey Ganache Filling and Irish Cream Frosting

Posted on

IMG_2977

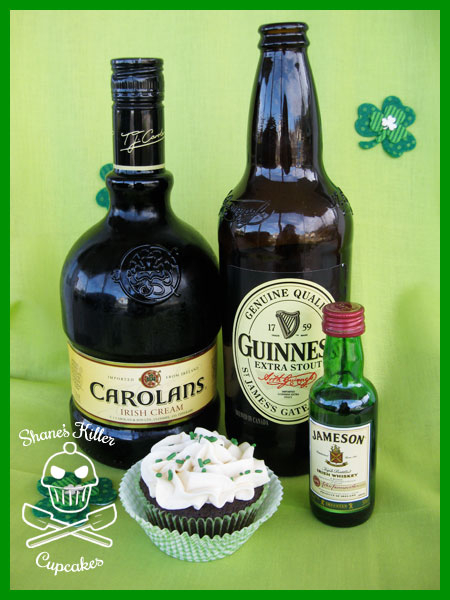
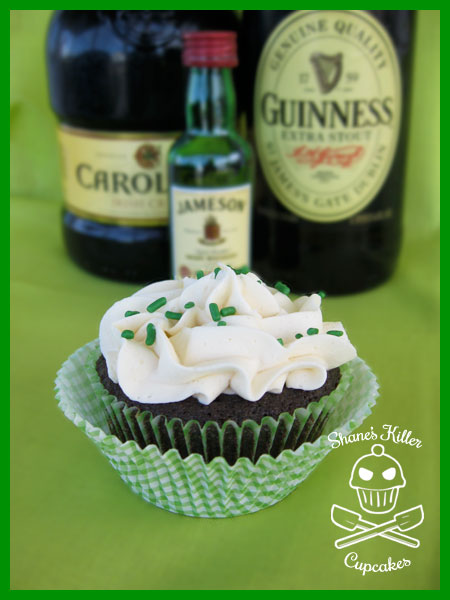
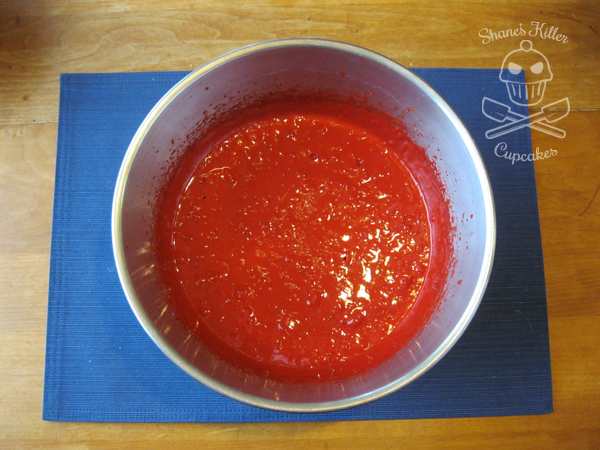
I love the combination of the ingredients in the unfortunately named alcoholic drink the Irish Car Bomb. It includes Guinness Stout, Jameson Irish Whiskey, and Baileys Irish Cream liqueur. It’s called Irish because of the Irish alcohols used in the drink, but the drink originated in America. The “car bomb” part of the name in part refers to the shot of Baileys with whiskey floated on top, being dropped or “bombed” into a glass of Guinness, but also to the history of car bombs that have plagued Ireland in years past.

Many find the name offensive, but that’s the point isn’t it? Alcoholic drinks are named outrageous things so that people remember them, for example: Agent Orange, Kamikaze, Redheaded Slut. Alcoholic drinks tend to be offensive. That’s just how it is. I’m not here to judge, I’m just here to bake! So let’s get to it!

IMG_2986

I used Brown Eyed Baker’s “Irish Car Bomb Cupcakes” recipe to make these but changed a few things about the recipe to suit my own needs. First, I decided not to call what I made Irish Car Bomb cupcakes, mainly because I chose to use Carolans Irish Cream instead of Baileys and many would not consider it a true “Irish Car Bomb” without the holy trinity of Guinness, Jameson, and Baileys. For the purposes of this recipe, Carolans Irish Cream works just as well for the frosting, but if you want the more authentic taste of Baileys, I’d suggest using the exact recipe from Brown Eyed Baker.

IMG_2988The other thing I decided to try was splitting the batter into two, making one half as Brown Eyed Baker did, and the other with dairy substitutes for the heavy cream and sour cream. They aren’t completely vegan, but my boyfriend prefers less dairy in his diet, and I wanted him to be able to eat these too! Plus he helped me make these, so it was only fair to make something he could eat.

For the less dairy version of these cupcakes, I used almond milk in place of the heavy cream, and vegan sour cream instead of regular sour cream. The vegan sour cream didn’t quite taste like real sour cream, but since it was mixed into the batter, the taste didn’t matter much and it moistened the cake just like the regular sour cream did.

Amazingly, the alternative batter cooked up better than the regular batter. The less-dairy cake cooked faster and rose better than the regular cake. I had to cook the regular cupcakes longer than what the recipe suggested. Not sure what I did wrong with Brown Eyed Baker’s recipe. Also, the almond milk ganache thickened quicker than the heavy cream one (which is good). It was interesting how different the two batters worked out.

IMG_2976
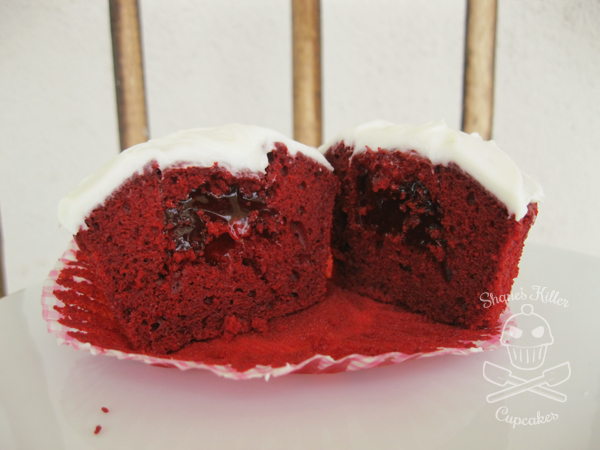
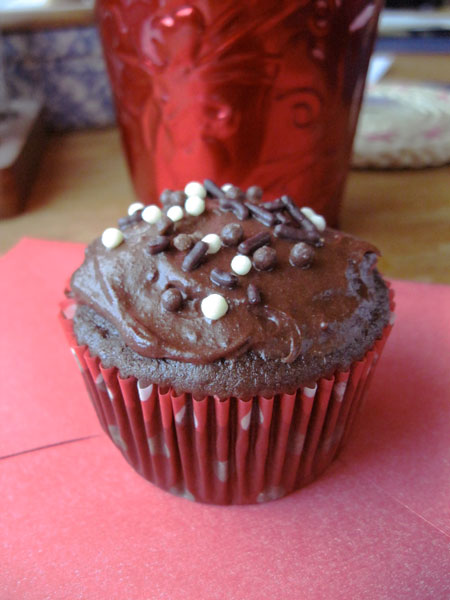
Taste wise, the cupcakes were about the same. You’d never miss the dairy products that I cut out of the alternative cupcakes. I could taste the Guinness in the cake as well as the whiskey in the ganache. I would have liked more of a whiskey flavor though. You might want to add a little more whiskey to the ganache if you like the flavor. The frosting was a little sweet for my tastes on its own, but the bittersweet ganache counteracts the sweet well when it’s eaten all together.

Speaking of the frosting, the recipe calls for 2 cups of butter! That’s a crazy amount. One reason my frosting might have been too sweet is because I chose to use less butter but only cut the powdered sugar buy one cup. Therefore, I might have used too much powdered sugar for the amount of butter. If you cut the butter down, make sure to proportionally cut the confectioner’s sugar too, or it could end up too sweet like mine (unless you like really sweet frosting).

IMG_2989
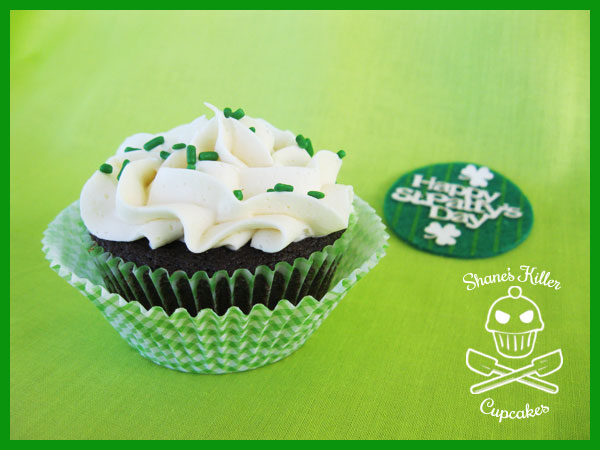
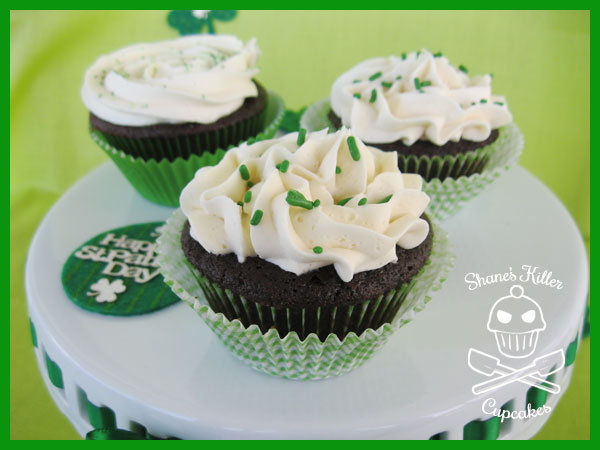
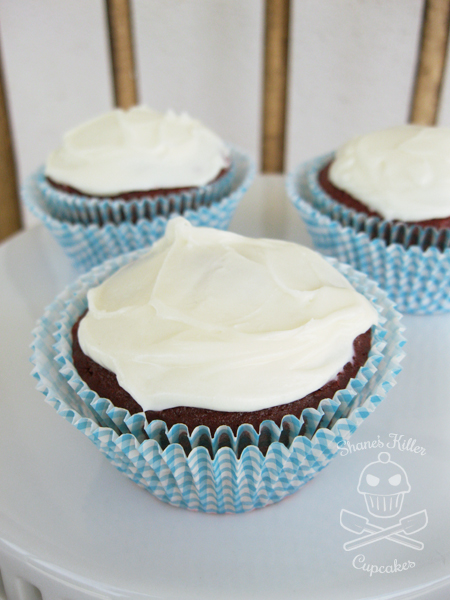
These cupcakes are really rich and boozy: a perfect way to celebrate St. Patrick’s Day. Although the recipe says they only take one hour to make, I highly doubt anyone could finish these in an hour unless you are a quick professional baker. They took me several hours to prepare, mix, bake, and frost, and that was with help! Doing these on my own would have been difficult. I’d suggest making these with a friend, and then drink the extra alcohol while you’re waiting for them to cook. 😉 Keep in mind that these cupcakes do have a slight alcohol content, because the ganache and frosting do not have the alcohol cooked out of them. They are not for those under the legal drinking age.

Have a fun and safe St. Patrick’s Day and drink (and eat) responsibly!

Pin It

My Fave: Betty Crocker Decadent Supreme Chocolate Mousse Cake Mix

Posted on

IMG_2921Sometimes I’m too pressed for time, or too lazy, to make cupcakes from scratch, so I’ll turn to box mixes in my time of need. In general, I prefer Duncan Hines cake mixes, but this cake mix above, Betty Crocker’s Decadent Supreme Chocolate Mousse Cake, is a winner.

I found a bunch of boxes of it for $0.99 each at Grocery Outlet a while ago and stocked up. I think it’s still sold in regular grocery stores, but the box might look a little different now. It comes with the cake mix and a packet to make the chocolate mousse topping. Both are super easy to prepare, and if cooked right, the cupcakes will turn out moist and delicious (I cook the cupcakes for about 20 minutes at 350 degrees F, checking them at 15 minutes).

I have not tried making it into a layered cake like the box suggests, but I have made it into some great cupcakes multiple times. I like to add chocolate chips or other candy to the batter before cooking.

The mousse topping is light and fluffy, almost pudding-like, and very tasty. It’s easy to make too! All you have to do is add some milk to the packet of mousse powder and voilà!: mousse topping! It would be a good dessert all on its own.

This was my last box, I hope I can find it at the store next time. Doubt I’ll find it for $0.99 again though.

IMG_2922

***This review was my idea and I was not compensated by Betty Crocker or any one else. ***
Related Posts Plugin for WordPress, Blogger...Pin It