Cake It Easy No-Bake Cake Pop Kit Review

Posted on

IMG_3600
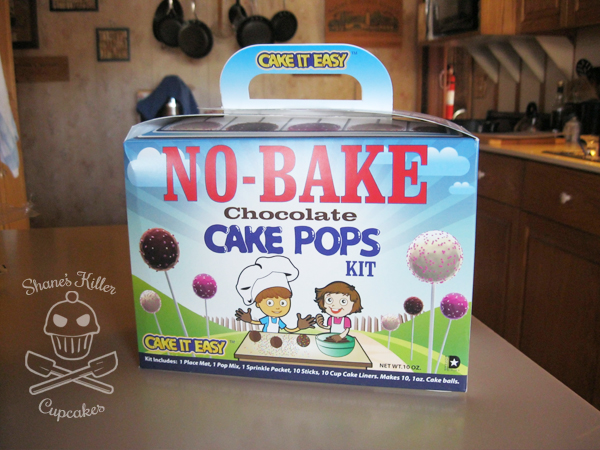
I received this cake pop kit for review from Cake It Easy last week and couldn’t wait to try it once I had enough time to really review it properly. The kit is very easy to use and would be a great activity for kids to do on their own since it doesn’t require a hot oven.

IMG_3608The kit includes the following supplies:

  • No Bake Cake Pops Mix in Chocolate
  • Rainbow sprinkles
  • 10 cake pop sticks
  • 10 paper cupcake liners
  • A paper mat to work on

The only thing you need to complete the kit is some water and oil. The box also has a couple variation suggestions if you don’t want to use water. It says the water can be substituted with cream cheese, melted butter, frosting, etc., but I don’t know if it’s an exact amount substitution or if you have to use different amounts of those other ingredients. Also, if you use the melted butter instead of water, do you still use the oil? That wasn’t clear. Although I like that they include other options for making the cake pops, I find this substitution section a little vague and ambiguous. The rest of the instructions are easy to follow though.

IMG_3609
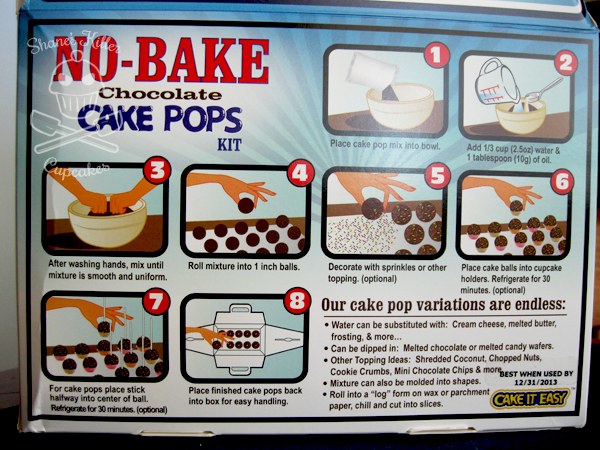
I like that they include a paper workspace sheet so that you don’t get your table or countertop messy. A sheet of wax paper or parchment paper would also suffice if you need more space to work than just the sheet that is included.

IMG_3613

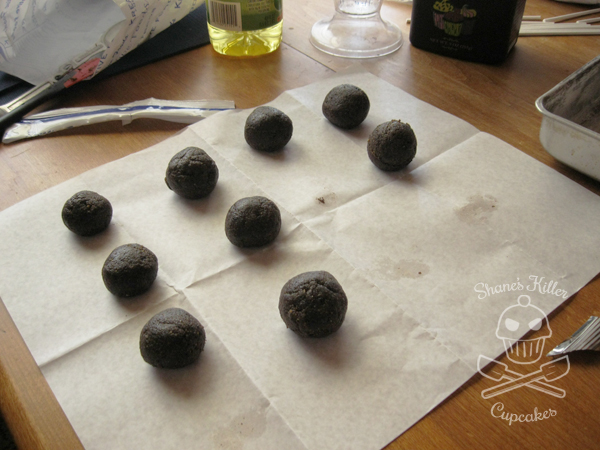
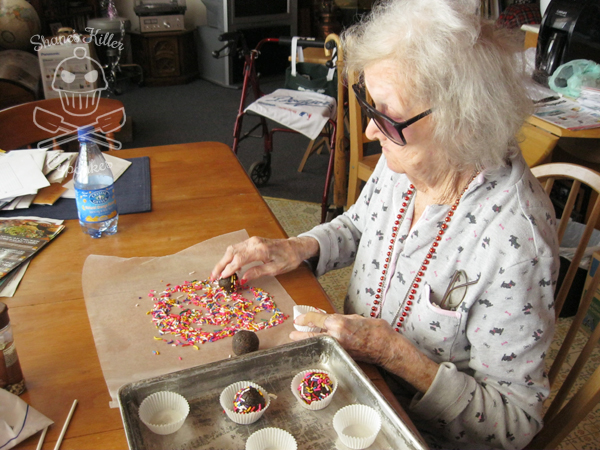
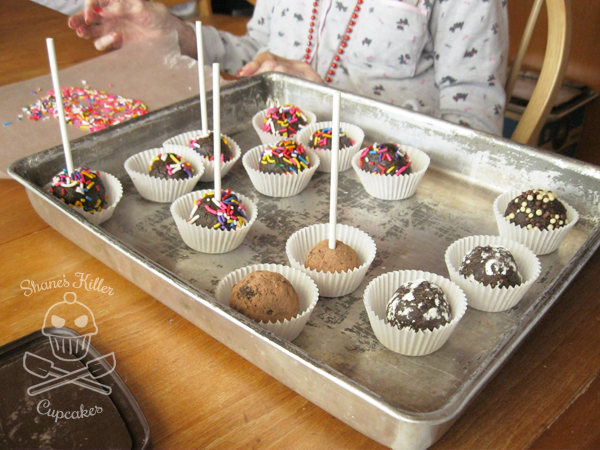
I used the included sheet to lay out the cake balls as I made them and got a sheet of wax paper out for the decorating. This kit is so easy to use, even my 93 year old grandma was decorating like a champ!

IMG_3612Once you’re done decorating the cake balls you can put them in the included paper cups and add the sticks if you want to make them into pops. The instructions say to put the sticks into the balls and then chill them, but I found that without some kind of “glue” like candy melts, the sticks didn’t really stay attached to the cake balls even after chilling them for a while.

I used the rainbow sprinkles that came with the kit, as well as some of my own cocoa powder, powdered sugar, and some other candy sprinkles to decorate these with.

IMG_3616If I were to make these again, I think I’d try the cream cheese substitution because the water and oil cake balls were not as rich as I was hoping they’d be. They didn’t taste bad but were just too plain.

It took no more than 30 minutes to make these and were super easy put together. Despite a few of the drawbacks like the sticks not staying in the cake balls, I’d definitely recommend this cake pop kit, especially if you have kids. I had a lot of fun making these with my grandma. I just wish it made more pops! These cake pops went quickly.

The kit retails for $19.95 USD and ships for free! You can buy these kits directly from their website or on Amazon.

Connect with Cake It Easy on the web!

Cake It Easy’s website

Cake It Easy on Facebook

Cake It Easy on Twitter


***DISCLAIMER: I received this kit in exchange for my honest review of the product. I was not compensated monetarily.***
Pin It

Etsy Store Spotlight Review: Claudine Hellmuth

Posted on
il_570xN.425756729_o5le

Photo credit: Claudine Hellmuth

The amazing artist, Claudine Hellmuth, sent me an adorable Retro Oven Cupcake Box from her Etsy store to review for the blog. I was more than excited. I’ve been a fan of her shop for a while and had fun putting this little box together. It is available as a .pdf file and you can print as many of these cuties as you want! The file has all five colors (Red, Pink, Yellow, Aqua, and Green) in it as well as some cute oven mit tags, a cupcake tray, and some editable cupcake flags that can be attached to toothpicks.

il_570xN.425568687_p69a

Photo credit: Claudine Hellmuth

The first thing I did when I got the file was print out the blue oven. You need card stock, scissors, glue or a tape roller, and a scoring device to make these. You will also need an exacto knife to cut out the circle in the cupcake tray, and if you want, the window on the front of the oven.

IMG_3348Although it was pretty easy to construct, there were a couple parts that got a little tricky. I’m sure if I made these regularly I’d get pretty quick, but for a first time, it took me about 20 minutes in all to get this put together. I’d suggest watching her instructional video in addition to reading the written directions, because she gives you a few tips that make it easier to build and some ideas to make it look cuter.

I think mine came out pretty good! I’d love to make the other colored ovens too. They’re just so cute.

IMG_3357One thing I liked about these is that the ovens are a bit tall. There is enough room for cupcakes with toppers or tall frosting. The ovens would even be great for other small items like bags of candy, gift cards, small presents, etc.

lotsofroomAnother great thing is the price. You get all 5 oven colors, 1 cupcake tray, 8 cupcake flags with editable text, and 4 oven mitt shaped gift tags for $4.99! And you can print as many ovens as you want! Claudine even sells a commercial license for a one time fee of $20 per favor box design if you want to sell your own baked goodies in them. That’s a great deal.

Make sure to check out her shop to see all of her other designs. Not only can you find several other adorable favor/treat box designs (like an ice cream truck), you’ll also find printable dolls, decorations, and digital scrapbooking sheets. Most of her designs range from $4.99-$5.99. So affordable and very high quality.

banner

Claudine Hellmuth is an artist and illustrator. She loves creating “quirky, retro-whimsical” artwork to license to the gift, home and craft markets. She’s been featured in The New York Times, appeared on The Martha Stewart Show, HGTV and The DIY Network, and in 2012, launched an exclusive paper crafting line with the Home Shopping Network.

If you like her designs, make sure to follow her on Facebook, Twitter, and her blog. Also don’t forget to visit her website and sign up for her newsletter! The newsletter includes free printables and alerts you to new items in her Etsy shop.

What’s your favorite item in her shop?


Pin It

Duff Goldman by Gartner Studios Review and Giveaway

Posted on

giveawayimageThe great folks at Gartner Studios sent me some Duff Goldman products this week to review. I was curious to try this brand after seeing some of his interesting products on the shelves at Michaels before. Have you ever watched Food Network’s Ace of Cakes? Duff Goldman is the baker and creator of that show! Duff Goldman by Gartner Studios is the bakeware and cake decorating product line that was created to bring his unique style of baking to your home.

Receiving these products was exciting for me because they are flavors I don’t usually work with. Here’s a run down of the products:

  • Duff Goldman by Gartner Studios Red Velvet Cake Mix – Duff’s premium cake mixes use low protein and low gluten flour, which makes for a lighter, fluffier cake.
  • Duff Goldman by Gartner Studios Raspberry Cake and Cupcake Filling – Add a flavorful, tasty center to cakes and cupcakes with Duff’s zingy new Raspberry filling. It’s extra delicious when paired with Buttercream or Cream Cheese frosting. Which brings me to the last product for review:
  • Duff Goldman by Gartner Studios Cream Cheese Ready to Serve Frosting – Reach for the most delicious, easily spreadable frosting available, from the Duff Goldman by Gartner Studios collection. Other delicious flavors include: Fudge, Chocolate, and White.

IMG_3329Over the years I’ve noticed a negative stigma attached to boxed cake mixes and pre-made baking products. I know that “from scratch” recipes usually turn out better quality products and allow for experimentation more easily, but boxed mixes have their place too! When my boyfriend and I were making these red velvet cupcakes this week, he commented how much easier and less of a hassle it was to use these Duff products than it was the last time he helped me make cupcakes from scratch. It really was a lot easier and created much less of a mess to clean up later too. That’s why I don’t look down on boxed mixes. They definitely have their place when you just want to make a quick batch of cupcakes without having to devote your whole afternoon to them.

The Duff red velvet cake mix was simple to mix together. All you needed was some water, eggs, and oil. The batter itself was a little thinner than I expected, but didn’t effect the final product negatively. In fact they were very light and airy while still having a density that made them hold up well. The batter had a lot of red dye in it though. So much so that it stained my skin! But it washed off fairly easily. I’m not sure how easily it would have washed out of clothing though, so that’s something to keep in mind. Look how red it was!

IMG_3335

The ready-to-use raspberry filling came in a sealed plastic bag, so I just snipped off a corner and squeezed it into the centers of the cupcakes after coring them out with a large frosting tip. Then I took the center part out of the frosting tip, cut off the excess cake and placed the top part back on the cupcake once I filled it. The filling is sweet and slightly tart. If you like really tart raspberry flavor you might find this a bit sweet, but it isn’t overpoweringly sweet. And it paired well with the cream cheese frosting flavor.

coringcupcakeThe cream cheese frosting was one of the best canned cream cheese frostings I’ve ever tasted. It was also sweeter than most homemade cream cheese frostings I’ve made. Its main draw back was that it was rather thin so it isn’t very good for piping tall frosting. Whipping it and maybe adding a little powdered sugar to it might help thicken it a bit, but it’s best for frosting with a spatula in a thin layer on top of the cake. These cupcakes didn’t need a lot of frosting though, because there was already so much flavor in them. The the slight cream cheese flavor definitely went well with the red velvet and raspberry flavors of this cupcake.

IMG_3342

Overall, I was very impressed with these products from Duff Goldman by Gartner Studios. I was worried they’d taste dull because they are a mass produced product, but surprisingly, they had a lot of flavor and nice consistency. I would definitely recommend these products to others, especially those who want quality cupcakes in a short amount of time.

IMG_3343

BUY IT

You can find these products at several stores including Michaels, select Walmart and Target stores, or online at www.duff.com.

CONNECT

Stay up-to-date on all things Duff Goldman by Gartner Studios! Follow on Facebook and Twitter.

WIN IT!

One lucky reader will win their own package of Duff products! The package will have the same items I reviewed above including the Red Velvet Premium Cake Mix, Raspberry Cake and Cupcake Filling, and Cream Cheese Ready to Serve Frosting.

Open to U.S. residents of all ages only. Giveaway ends 6/30/13 at 11:59 pm EST.

Click HERE for complete giveaway rules.

a Rafflecopter giveaway

****I received these products free of charge for an honest review of the products. I was not compensated monetarily for this review and all opinions are my own.****
Pin It

eShakti Dress Review {and Giveaway!}

Posted on

IMG_2959wm

I’ll be changing things up a bit with today’s post. Instead of baking I’ll be talking about clothing. Specifically, I’ll be reviewing a dress I got from eShakti.com. eShakti, a vintage inspired woman’s online clothing store, specializing in customizable pieces ranging from sizes 0 to 36W, contacted me to ask if I was interested in reviewing a piece of clothing for them. So, wait, I get to review a cute piece of clothing, and I get to keep it? Uh, yes please!

Thus began a long drawn out process, all of which was my fault. I knew they were offering to give me free customization on the piece I was to review, but not being familiar with such an opportunity, I chose one of their standard sized dresses, because the measurements where pretty close to my own. That was a mistake. Why get a dress that’s “pretty close” to your size when you can get a dress that is exactly your size?!? Yeah, I don’t know why I didn’t think it through better.

CL0025693P

Her Fifties Sundress in poppy red. image ©eShakti.com

After browsing their many pieces, I decided on the Her Fifties Sundress in crimson (I don’t think this color is available anymore but the “poppy red” looks similar). The first dress I received (the standard sized one) was too big in the bust which made everything fit all wrong. I could have reviewed this dress, but I really wanted to see what the dress would be like if it fit right. Luckily, eShakti.com has amazing customer service, and allowed me to return the item and order the same dress with my customized measurements this time. Generally, customization only costs an extra $7.50, which is an amazingly affordable price. You can also choose to change the neckline shape or alter the sleeves or hem length if available for the piece you want to buy. Find out more about their customizeable options here.

customban9-1-13-2

image ©eShakti.com

A few weeks later, after receiving the ill-fitting dress, returning it, and receiving the better fitting dress, I finally had a great piece to review. I have got to thank eShakti for working so closely with me to get me a product that I would love! Here is all the good and bad about the dress I received:

IMG_2946wm

Bra strap snaps

PROS:

  • Comfortable
  • Lightweight
  • Cute retro style
  • It fit well with my customized measurements
  • The dress is well made
  • It has snaps under the dress straps where you can attach your bra straps to hide them (refer to the picture to the right).
  • There is an invisible side zipper to give you more room to get the dress on (although it was a little difficult to zip up).
  • It has pockets (but you can get it made without pockets if you like).
IMG_2956wm

Sorry for the pit shot!

CONS

  • Wrinkles easily
  • It shows sweat stains very easily and also my deodorant really liked to rub off onto the dress (if you got this dress in black, the sweat problem may not be as noticeable).
  • Without a petticoat, the skirt is a little limp.

Overall, the pros outweighed the cons. I really love this dress, though I might have to wear a cardigan over it to cover those pit stains!

eShakti has so many styles to choose from. With their spring line just released, you have a lot of new pieces to browse including dresses, skirts, and tops. Also, for any upcoming brides out there, they have a great bridesmaid dress section set up to help you find the perfect fit, color, and style for all your bridesmaids!

Besides having great clothes, I really like that everything on eShakti is very affordable, the shipping is quick (even for customized pieces), they can make items in so many sizes, and the customer service, in my experience, has been quick to reply and helpful.

frontsidewm

Now for the fun part!

BUY IT: They are offering my readers 20% off with the coupon code SHNESKLLER (expires 3/20/13).

UPDATE (3/4/13): Good news! Due to a glitch, some blogger coupon codes did not work when people tried to use them, so they’ve fixed the issue and have extended the 20% off offer until March 20th!

Note: (*conditions apply)
Code has to be entered in the ‘Promotional Code’ box. No Minimum Order Value. The discount code is not case sensitive. The code can be used any number of times until the validity period. This code can be clubbed with any other gift coupon or gift card in the same order. This discount code is not applicable on our Overstock category. Not applicable on previous purchases.

According to the website, if you’re new to eShakti.com you can save $25 on your first order if you register with their site! Not sure if this is stackable with the coupon code above but it’s worth checking out.

Giveaway

WIN IT: On top of all of these great discounts, they are also giving away to one of my readers one item of choice under $75 from eShakti.com! Fantastic!

To Enter: Fill out the Rafflecopter widget below. The only mandatory entries are to enter your name and email address and to follow eShakti on Pinterest. If you don’t have a Pinterest account, you can sign up for one here for free.

Time period: Giveaway begins on 3/1/13 at 12:01am EST and will end on 3/22/13 at 11:59pm EST.

The Prize: One item of choice under $75 from eShakti.com.

Giveaway is open to all legal residents of USA and Canada who are 18+ years of age.

Complete Official Giveaway Rules

a Rafflecopter giveaway

* This review is my honest opinion. I received a dress from eShakti for the purposes of this review. I was not compensated in any other way. I have styled the dress with my own cardigan, belt, petticoat, and shoes in the above photos. 
Pin It

How to Measure Flour with a Kitchen Scale {Giveaway}

Posted on

Measuring flour accurately can be difficult. When using measuring cups, the way in which you fill the cup can drastically change the amount of flour in it depending on if it’s sifted, packed down, scooped or spooned into the cup. This is why measuring flour by weight is the most accurate way to get the correct amount of flour for a recipe.

I received an EatSmart Precision Elite Digital Kitchen Scale for review* so I decided to show its features while demonstrating flour measurement.

The scale is quite nice. I’ve tried the EatSmart basic kitchen scale, the Precision Pro, before but this scale has several improved features. The button surface is smooth with no gaps for crumbs to fall into and it has an easy to read screen.

It also has a large flat surface for measuring. This is helpful because you can put a large bowl on there and still be able to see the screen. Some excellent features that I liked about this scale are:

  • Easy to use tare feature and auto turn-off
  • Can weigh up to 15 lbs
  • Easy to clean stainless steel
  • Batteries are included!
  • It comes with a little calorie counting guide as well

For those of you with resolutions to lose weight this year, this scale would be fantastic for portion control and serving sizes. With the included calorie counting guide and such an easy-to-use scale, keeping your portions down should be a snap.

Now, how to measure flour. I whipped up this little video demonstrating how I measure flour. I scoured the internet trying to find out how much a standard US cup of all-purpose flour would weigh. The answers I found ranged from 4.25 oz-5oz and 120g-140g. I was a little confused. I wasn’t sure how I would figure it out. Finally I had the thought to look at the nutrition facts on the bag of flour I was using. It told me that 1/4 cup was equal to 30g. I decided to go with this information and measured out 120g of flour.


This same method can be used for confectioner’s sugar and many other dry ingredients.

**CORRECTIONS: In the video, I said that you could use the scale to weigh liquid ingredients, but that is not quite correct. I’m sure it would be possible, but it would require a lot of conversions.  Measuring cups or a measuring beaker like this one are best for liquid ingredients. I should have done another video with corrections, but it took so many takes to get what you see above I decided to just correct myself in the post. The scale is great for all of your dry ingredients though.

Another thing I said in the video that needs clarifying is about sifted flour. If you use a scale to weigh the flour, you don’t have to sift it first, although it probably should be sifted before adding it to your recipe. When weighing, sifted or packed flour will still weigh the same. On the other hand, you can get a much better measurement with sifted flour if you are using a measuring cup.

If you would like to know more about EatSmart products, you may follow them through any of the ways below:

EatSmart on FacebookTwitter, Pinterest, Google+, and the EatSmart Blog.


{Giveaway}

EatSmart has graciously offered to give one of my US readers a scale of their own! One reader will receive an EatSmart Precision Pro Multifunction Digital Kitchen Scale. This scale is just as handy as the Precision Elite.

The giveaway is open to those who are 18 and older and a resident of the US. I’m sorry if you are from another country. EatSmart is sending this scale directly to the winner and they will only ship within the US.

Giveaway ends 01/16/13 at 11:59pm EST.

You MUST answer the two mandatory options for any other entries to count.

UPDATE: I was informed that some of you may be having trouble leaving comments. If this is the case, feel free to email your comment to me through this contact form. Thanks.

a Rafflecopter giveaway

International Giveaway

As promised, I’ve added a small giveaway for my international readers. I’d love to give away more, but this one is coming out of my own pocket. Anyone may enter this giveaway as long as you can receive money via Paypal or an Amazon gift card.

If you’re having trouble leaving a comment, read the bolded message above.

a Rafflecopter giveaway

 
*Disclaimer: I was given this product free of charge for my honest review. I was not compensated monetarily. 
Pin It

Crazy for Cake Pops Review and Giveaway

Posted on

I received a copy of Crazy for Cake Pops: 50 All-New Delicious and Adorable Creations by Molly Bakes for review from Ulysses Press recently and decided to make something from the book. There are many great decoration ideas in this book with lots of photographs of each cake pop.

Besides the cake pop decorations, there are also many other sections of the book. It starts out with descriptions of all the equipment you’ll need for the projects, as well as recipes for chocolate, red velvet, vanilla, peanut butter, toffee, and lemon cakes and the frostings that go with them. There is also a section in the back that shows some techniques for making the cake pops.

Never made cake pops before? Don’t worry. There are detailed explanations of how to make cake pops and plenty of colorful photos to show you the process. I’ve made cake pops once before, so I was familiar with the instructions, but it was nice to refresh my memory.

As I flipped through the book I came across a ton of designs I wanted to try, but I settled on the Moustache Cake Pops. I thought these looked great and simple.

Unfortunately, I had a few issues with making these. One thing I’ve realized from making cake pops is they always end up more complicated to make than they look. I used the recipe for the chocolate cake and chocolate frosting from the book (recipes below). The cake turned out pretty good although I may have overcooked it. This didn’t matter too much though, because I mixed it with the frosting and it became moist again.

The frosting was a little weird though. I followed the instructions exactly, but the mixture was less like frosting and more like a truffle mixture. It tasted great but wasn’t fluffy like the instructions said it would be. Not sure what happened. I mixed a little half and half in to soften it, but it was still really hard. It did mix into the cake crumbles well though and the mixture seemed right, so I guess this “frosting” didn’t mess it up, but I wouldn’t use the recipe for actual frosting.

Another problem I had was that my cake mixture wasn’t holding together well enough to form the moustache. It kept falling apart. I don’t think I mixed enough of the frosting into the cake.  Oops! I was able to make regular cake pops though so this is what I ended up with:

Not too bad, although I was bummed that the moustaches didn’t work out. I’ll try them again sometime. If you think you could do better, the recipes and instructions for the Moustache Cake Pops are below. Post a picture on my facebook page if you give these ones a shot. I’d love to see them!

Chocolate Cake

Yield: Makes enough for approx. 20 medium cake balls

Ingredients

  • 55 grams (8 tablespoons) cocoa powder
  • 250 milliliters (1 cup) boiling water
  • 120 grams (½ cup) unsalted butter, softened, plus more for greasing
  • 200 grams (1 cup) granulated sugar
  • 200 grams (1-2/3 cups) self-rising flour*, plus more for the tin
  • 1 teaspoon baking powder
  • ¼ teaspoon baking soda
  • ¼ teaspoon salt
  • 1 teaspoon vanilla extract
  • 2 eggs, at room temperature

Instructions

  1. Put the cocoa into a heatproof bowl, pour in the boiling water and stir until combined. Set aside to cool. Preheat the oven to 375°F (190°C). Lightly grease and flour a 10-inch (25-centimeter) round cake tin. Sift together the flour, baking powder, baking soda and salt. Cream the butter and sugar until pale and fluffy. Mix in the vanilla. Add the eggs one at a time, mixing well. Pour in the dry ingredients and gently beat until combined. Fold in the cooled cocoa until the color of the mixture is even. Pour into the tin and bake for 45–60 minutes, or until a toothpick inserted into the center of the cake comes out clean. Once baked, leave to cool in the tin for 20 minutes. Turn out onto a wire rack to finish cooling.

Notes

*I didn't have self-rising flour so I made some using this recipe: 1 cup flour, ½ tsp. salt, 1½ tsp. baking powder sifted together.

https://shaneskillercupcakes.com/2012/03/crazy-for-cake-pops-review-and-giveway/

Chocolate Frosting

Ingredients

  • 120 grams (½ cup) unsalted butter, softened
  • 200 grams (2 cups) powdered sugar, sifted
  • 100 grams (1-2/3 cups) chocolate, melted and cooled

Instructions

  1. Cream the butter. Gradually add the powdered sugar and then the chocolate. Continue to cream until light and fluffy. Refrigerate for 30 minutes before using.
https://shaneskillercupcakes.com/2012/03/crazy-for-cake-pops-review-and-giveway/

Moustache Pops

Ingredients

  • 20 medium cake balls, chilled
  • 1 (14-ounce) bag black candy melts

Instructions

  1. Roll each cake ball into a log shape with your hands. Use a lollipop stick to make an indentation in the top center and bottom center of each “log.” Squeeze and pinch the center of the “log” to shape the middle of the moustache. Now squeeze and pinch the ends, curling each one upwards to create a handlebar moustache shape.
  2. Melt the candy. Dip the end of each lollipop stick ¾ inch into the candy and insert a stick into the center of each moustache. Leave to set. Dip each pop into the candy, dipping from left to right to get an even coating. Insert into a polystyrene block to dry.
https://shaneskillercupcakes.com/2012/03/crazy-for-cake-pops-review-and-giveway/

{Overall Opinion}

Overall, I love this book. I personally need to practice making cake pops more often so I can make some of the more complicated cake pops in the book. For those of you that are cake pop newbies like myself, there are some easier designs to make in the book too. The great thing about cake pops is there are many ways they can be decorated, and even the easiest ones (like mine above) still look nice. I would definitely recommend this book to anyone interested in making cake pops.

{Buy It}

Crazy for Cake Pops is available on several websites such as Amazon and Barnes and Noble in paperback and e-book form.

{Win It}

Ulysses Press has graciously offered to send one of my readers a copy of Crazy for Cake Pops: 50 All-New Delicious and Adorable Creations! To enter fill out the Rafflecopter form below. If you’ve never filled one out before, sign in with either Facebook or log in with your name and email address. Then fill out the first three entries. You don’t have to complete the first three entries but you can’t get to the other entries without finishing them. Once completed, all of the extra entries will become available for completion. Let me know if you have any problems filling out the form.

I WILL BE VERIFYING ENTRIES! So please leave any requested info for the entries. If any requested info is missing from the form, I will not be able to verify your entry and will choose another winner.

The giveaway will end at 11:59pm EST on March 17, 2012. US entries only, please. Terms and Conditions are located at the bottom of the Rafflecopter widget.

Continue reading »

Related Posts Plugin for WordPress, Blogger...Pin It