Cake Artist Spotlight: Marcella Robin of MRobin Cakes

Posted on

As an artist and a baker, I like to explore the art form of cake decorating. It’s one of the reasons I’d rather decorate a cake than bake them, although recipe experimentation can be its own form of art as well. When I come across other bakers who express their artistic abilities through cake design, I take notice. The cake artist I’m spotlighting today has found a beautiful way to make sculptural pieces of art through the baking process.

cakes

Meet Marcella Robin, owner, baker, and cake designer at MRobin Cakes in Portland, Oregon. She has created her own unique style of cake design using jaconde, a thin decorative exterior sponge cake, that she forms into classic patterns reminiscent of mid-century motifs. The insides of these entremet cakes are filled with sponge cake, creams, custards, fruits, mousses, etc. With her bachelors degree in sculpture and as a graduate of the Professional Pastry and Bread program at the Northwest Culinary Academy of Vancouver in British Columbia, Robin feels she’s found the perfect balance between her two loves: art and baking:

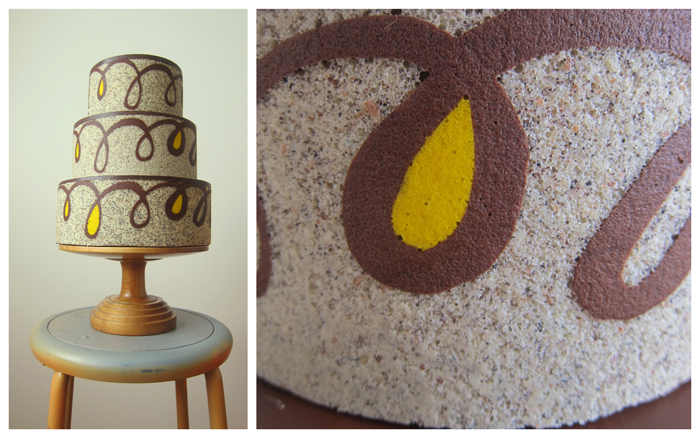
I have found cake design to be the perfect blend of my love for art and baking. While I prefer a traditional cake form, the process I use is creative and modern. After years of cake making and designing, my current focus is on entremet wedding cakes. These specialty cakes include layers of mousse, bavaroise, dacquoise, sponge cake, caramels, fruit and other fillings. With its bold design and enticing outer layer of decorative sponge cake, the entremet is unique and above all delicious.

I highly recommend watching Cineastas great video highlighting MRobin Cakes below. It gives Marcella Robin the opportunity to describe her style of cake design and shows us her amazing process for creating such beautifully elegant cakes.

M. Robin – Cake Design from Cineastas on Vimeo.

Just look at all these awesome designs!

donteatdaisies pinkstripe sillychocolate wobble
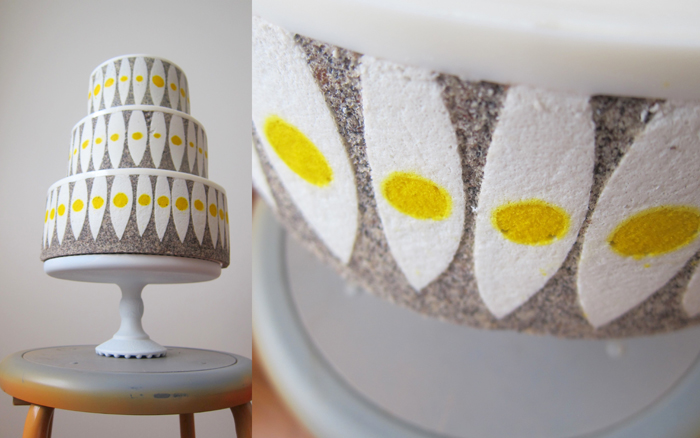
[Photos from MRobin Cakes]
 
Pin It

My Fave: Betty Crocker Decadent Supreme Chocolate Mousse Cake Mix

Posted on

IMG_2921Sometimes I’m too pressed for time, or too lazy, to make cupcakes from scratch, so I’ll turn to box mixes in my time of need. In general, I prefer Duncan Hines cake mixes, but this cake mix above, Betty Crocker’s Decadent Supreme Chocolate Mousse Cake, is a winner.

I found a bunch of boxes of it for $0.99 each at Grocery Outlet a while ago and stocked up. I think it’s still sold in regular grocery stores, but the box might look a little different now. It comes with the cake mix and a packet to make the chocolate mousse topping. Both are super easy to prepare, and if cooked right, the cupcakes will turn out moist and delicious (I cook the cupcakes for about 20 minutes at 350 degrees F, checking them at 15 minutes).

I have not tried making it into a layered cake like the box suggests, but I have made it into some great cupcakes multiple times. I like to add chocolate chips or other candy to the batter before cooking.

The mousse topping is light and fluffy, almost pudding-like, and very tasty. It’s easy to make too! All you have to do is add some milk to the packet of mousse powder and voilà!: mousse topping! It would be a good dessert all on its own.

This was my last box, I hope I can find it at the store next time. Doubt I’ll find it for $0.99 again though.

IMG_2922

***This review was my idea and I was not compensated by Betty Crocker or any one else. ***
Pin It

Grumpy Cat Says Birthdays Are Awful

Posted on


IMG_2824wm

IMG_2834

Recently, a couple of my friends had birthdays, so I wanted to make them a special cake. We all love cats, and I am obsessed with little Miss Tarder Sauce a.k.a Grumpy Cat, so I created this Grumpy Cat cake.

I used a cute “vintage” Wilton cake cake pan from the 1970s for the shape and then frosted Tard’s adorably sourpuss face onto it. I love how it turned out. If I had had more time, I would have gone into more detail. Have any of you ever made a cool cake for a birthday before?

IMG_2829wm

Pin It

Pac-Man Cake {Guest Post}

Posted on

Recently I asked my friend and blogging buddy, Amber Seree, to write a guest post for Shane’s Killer Cupcakes. She came up with a great tutorial for making a Pac-man Cake! If you’d like to be a guest poster for SKC read the Guest Post Guidelines and contact me to pitch me your idea. Enjoy!


Hey there, guest blogger Amber here. I thought I’d share this with you all, because this cake is an easy, fun way to create something for your child’s birthday, or for a gaming enthusiast. My step son and I baked and decorated this together for his birthday. It turned out delicious and it was fun too!

You will need:

  • 1 Box Duncan Hines Devil’s Food Cake Mix ( or other chocolate cake mix. Use ingredients on the box accordingly)
  • 1 1/3 Cups Water (from Duncan Hines mix box)
  • 1/2 Cup Vegetable Oil (from Duncan Hines mix box)
  • 3 Large Eggs (from Duncan Hines mix box)
  • 1 Bag Dark Chocolate Chips (substitute with semi-sweet or milk chocolate, or mix if you’d like)
  • 1 Can White Frosting
  • 1 Can of Chocolate Frosting (the large can is not needed, the regular size will do)
  • Yellow Food Coloring
  • Butter (to grease the pans)
  • 2 8” x 1 1/2” Round Baking Pans
  • Flour (for cake pans)
  • Large Mixing Bowl
  • Whipped Cream (optional)

Other:

  • A spatula would be nice
  • An electric mixer or whisk (though you can use a fork!)
  • Something to spread the frosting evenly, you can use a butter knife, but there are specialty tools

Directions

Baking:

  1. PREHEAT oven to 350° F for metal or glass pans, or 325° F for dark coated pans. Butter the insides of the pans lightly. You can flour the inside of the pan as well, though we skipped that step and it came out fine.
  2. Blend the cake mix, oil and eggs in a large bowl until completely mixed. With an electric mixer this will be around 2 minutes, if you are mixing with hand, this will take longer.
  3. Pour the batter into cake pans. Add chocolate chips as desired. My stepson chose to sprinkle them liberally on one layer, and concentrate them in the middle on the other. However you want to do it should work fine. If you will use chocolate chips for the eyes, be sure to save at least 10 to accomplish this.
  4. Bake for 33-36 minutes for metal or glass pans. Add a few extra minutes for dark coated pans. Trick: carefully stick a toothpick into the center of your cake, if it comes out clean, it’s ready. Just be aware of your chocolate chips!

Frosting:

  1. Put white frosting into bowl. Add up to 10 drops of yellow food coloring at first, and mix it well. You may need to mix in more to get the vibrant yellow you are looking for. I added 24 yellow drops and one green drop, but the green addition almost became a disaster. If you are going to try to add 1 green drop for a richer, deeper yellow, I’d recommend having an extra can of white frosting on hand just in case. I also highly recommend starting with only 10 yellow drops and working your way up. The type of food coloring and frosting you use may make results vary. Once you have the yellow color you are looking for, set it aside.
  2. Once cake layers COOL COMPLETELY, flip the first one out onto a plate. Be careful of breaking it. The best way I have found is to set plate or platter on top of the cake pan and flip them both upside down together. I’d recommend flipping it back over so that the flat edge is on the bottom. To do this, simply repeat the steps above but without the cake pan. Make sure you use the final serving plate or platter the second time.
  3. Frost the top of the first cake layer thickly with chocolate frosting.
  4. CAREFULLY flip the second cake layer on top of the first. For this top layer, you want to be sure you get the bottom (flat edge) on top, and the rounded (top) facing down. This way you get a smooth surface for your pac man.
  5. Once your top layer is in place, carefully frost the entire cake in the yellow frosting. Be sure to leave an empty triangle for the mouth! Pay extra care to the sides, especially when you get close to the chocolate frosting in between the two layers. Leave the triangle empty all the way down the side of the cake.
  6. Fill in our mouth area with left over chocolate frosting. You may want speciality tools for this, but I used a butter knife and a steady hand and it came out fine.
  1. Lastly, make an eye with chocolate chips. Though you could probably use a chocolate candy melt, a reeses peanut butter cup or other various chocolate candy.
  2. To add extra flair (& possibly cover up the bottom edge of the frosting, as in my case) add whipped cream flourishes around the base of the cake, and voila! You’ve got yourself a Pac Man cake.


{About the Author: Amber Seree}

 Amber Seree is a graphic/web designer, as well as a writer, and a sometimes-baker with a passion for reading and watching good things.  You can find her art at {infinitefathoms.com} or her writing over at {hellcatchitchat.com}, where she is currently blogging about TV and movies. If you like to watch good things too, then check it out.
Pin It

Silent Hill Nurse Cake

Posted on

So as I said in a previous post, I’m going to be a zombie nurse for Halloween this year. In my preparation for my costume I’ve come across many photos of the Bubble Head Nurses from the video game and movie Silent Hill. In my search, I found MammaJammaCakes Flickr that had an amazingly realistic looking Silent Hill Nurse cake posted. This cake is fantastic, but I’d be afraid to go anywhere near it. The nurse might start shuffling out of the base and kill me or something. *Shudder*

[polldaddy rating=”5093286″]


Monster Movie Cakes

Posted on

Believe it or not, these awesome Frankenstein and Bride of Frankenstein cakes by DebbieDoesCakes are wedding cakes!  All I can think of when I see them is Halloween though. Wouldn’t these be great at a monster movie themed Halloween party? See more of her creations at her Flickr site.

[polldaddy rating=”5093286″]

Related Posts Plugin for WordPress, Blogger...