Peanut Butter and Jelly Cupcakes

Posted on

I’ve always loved peanut butter and jelly sandwiches so I decided I’d try making one as a cupcake. There are many recipes out there making different versions of this cupcake, but none were exactly what I wanted. For example, I’d see a cake recipe I liked but didn’t like the frosting that went with it or I didn’t like how the jelly was used in the cupcake, etc.

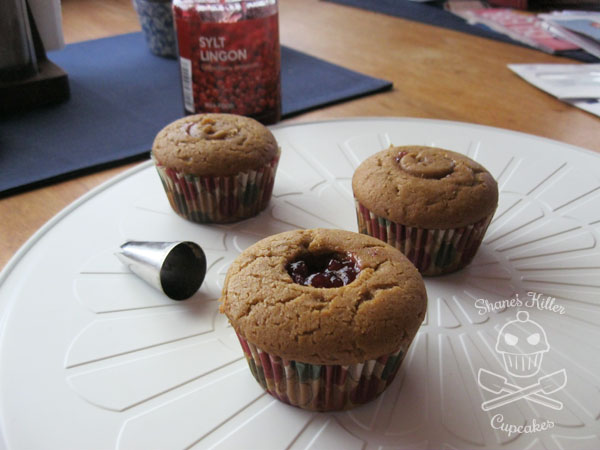
I knew from the start I wanted to use my favorite jam/jelly I get from IKEA. Made from lingonberries, it’s a perfect blend of sweet and tart. Lingonberries sort of tast like cranberries. This the same preserves IKEA uses in its Swedish meatball meal from their restaurant. For the peanut butter, I used Trader Joe’s natural peanut butter. The recipe I used for the cupcakes from Taste of Home uses the overly processed sweet peanut butter, like Jif or Skippy, but the natural peanut better worked just as well.

IMG_3112

When the cupcakes were done baking, they smelled like delicious peanut butter cookies. I put the jam in the middles of the cupcakes once they were done cooling. I used my #1 Wilton frosting tip (one of the large ones) to cut the holes out. Save the little piece of cupcake that you cut out of the center and cut off the top of it. This top will be put back onto the cupcake like a cap on top of the jam filling. To make the jelly or jam easier to spoon, slightly warm it in the microwave for 10-15 seconds. You don’t want it hot, just a little more runny so it will fill the hole nicely. This is especially good for jelly you pull out of the fridge.

IMG_3107

The frosting is super easy. This Quick Vanilla Buttercream Frosting from the Food Network is a good one for this recipe. If you want more peanut butter flavor you could use a peanut butter frosting like the one that accompanies the Taste of Home recipe above, but I think the cupcakes have plenty of peanut butter flavor on their own. I was only able to get about 15 cupcakes from the the recipe despite it being labeled as 18 servings. If you pile your frosting on like I did, make the whole recipe from Food network. If you only thinly frost the tops of the cupcakes, you could probably get away with only half a recipe.

Garnish the tops of the cupcake frosting with a little more jelly/jam. You might want to warm it up again for this, as it was much easier to drizzle the jelly when it was more liquid.

This was a very simple recipe to put together. I was happy to find that I already had all of the ingredients for this one in my kitchen which almost never happens! Now you can have PB&Js for lunch and dessert!

IMG_3113

Pin It

Chocolate Stout Cupcakes with Whiskey Ganache Filling and Irish Cream Frosting

Posted on

IMG_2977

I love the combination of the ingredients in the unfortunately named alcoholic drink the Irish Car Bomb. It includes Guinness Stout, Jameson Irish Whiskey, and Baileys Irish Cream liqueur. It’s called Irish because of the Irish alcohols used in the drink, but the drink originated in America. The “car bomb” part of the name in part refers to the shot of Baileys with whiskey floated on top, being dropped or “bombed” into a glass of Guinness, but also to the history of car bombs that have plagued Ireland in years past.

Many find the name offensive, but that’s the point isn’t it? Alcoholic drinks are named outrageous things so that people remember them, for example: Agent Orange, Kamikaze, Redheaded Slut. Alcoholic drinks tend to be offensive. That’s just how it is. I’m not here to judge, I’m just here to bake! So let’s get to it!

IMG_2986

I used Brown Eyed Baker’s “Irish Car Bomb Cupcakes” recipe to make these but changed a few things about the recipe to suit my own needs. First, I decided not to call what I made Irish Car Bomb cupcakes, mainly because I chose to use Carolans Irish Cream instead of Baileys and many would not consider it a true “Irish Car Bomb” without the holy trinity of Guinness, Jameson, and Baileys. For the purposes of this recipe, Carolans Irish Cream works just as well for the frosting, but if you want the more authentic taste of Baileys, I’d suggest using the exact recipe from Brown Eyed Baker.

IMG_2988The other thing I decided to try was splitting the batter into two, making one half as Brown Eyed Baker did, and the other with dairy substitutes for the heavy cream and sour cream. They aren’t completely vegan, but my boyfriend prefers less dairy in his diet, and I wanted him to be able to eat these too! Plus he helped me make these, so it was only fair to make something he could eat.

For the less dairy version of these cupcakes, I used almond milk in place of the heavy cream, and vegan sour cream instead of regular sour cream. The vegan sour cream didn’t quite taste like real sour cream, but since it was mixed into the batter, the taste didn’t matter much and it moistened the cake just like the regular sour cream did.

Amazingly, the alternative batter cooked up better than the regular batter. The less-dairy cake cooked faster and rose better than the regular cake. I had to cook the regular cupcakes longer than what the recipe suggested. Not sure what I did wrong with Brown Eyed Baker’s recipe. Also, the almond milk ganache thickened quicker than the heavy cream one (which is good). It was interesting how different the two batters worked out.

IMG_2976Taste wise, the cupcakes were about the same. You’d never miss the dairy products that I cut out of the alternative cupcakes. I could taste the Guinness in the cake as well as the whiskey in the ganache. I would have liked more of a whiskey flavor though. You might want to add a little more whiskey to the ganache if you like the flavor. The frosting was a little sweet for my tastes on its own, but the bittersweet ganache counteracts the sweet well when it’s eaten all together.

Speaking of the frosting, the recipe calls for 2 cups of butter! That’s a crazy amount. One reason my frosting might have been too sweet is because I chose to use less butter but only cut the powdered sugar buy one cup. Therefore, I might have used too much powdered sugar for the amount of butter. If you cut the butter down, make sure to proportionally cut the confectioner’s sugar too, or it could end up too sweet like mine (unless you like really sweet frosting).

IMG_2989These cupcakes are really rich and boozy: a perfect way to celebrate St. Patrick’s Day. Although the recipe says they only take one hour to make, I highly doubt anyone could finish these in an hour unless you are a quick professional baker. They took me several hours to prepare, mix, bake, and frost, and that was with help! Doing these on my own would have been difficult. I’d suggest making these with a friend, and then drink the extra alcohol while you’re waiting for them to cook. 😉 Keep in mind that these cupcakes do have a slight alcohol content, because the ganache and frosting do not have the alcohol cooked out of them. They are not for those under the legal drinking age.

Have a fun and safe St. Patrick’s Day and drink (and eat) responsibly!

Pin It

My Fave: Betty Crocker Decadent Supreme Chocolate Mousse Cake Mix

Posted on

IMG_2921Sometimes I’m too pressed for time, or too lazy, to make cupcakes from scratch, so I’ll turn to box mixes in my time of need. In general, I prefer Duncan Hines cake mixes, but this cake mix above, Betty Crocker’s Decadent Supreme Chocolate Mousse Cake, is a winner.

I found a bunch of boxes of it for $0.99 each at Grocery Outlet a while ago and stocked up. I think it’s still sold in regular grocery stores, but the box might look a little different now. It comes with the cake mix and a packet to make the chocolate mousse topping. Both are super easy to prepare, and if cooked right, the cupcakes will turn out moist and delicious (I cook the cupcakes for about 20 minutes at 350 degrees F, checking them at 15 minutes).

I have not tried making it into a layered cake like the box suggests, but I have made it into some great cupcakes multiple times. I like to add chocolate chips or other candy to the batter before cooking.

The mousse topping is light and fluffy, almost pudding-like, and very tasty. It’s easy to make too! All you have to do is add some milk to the packet of mousse powder and voilà!: mousse topping! It would be a good dessert all on its own.

This was my last box, I hope I can find it at the store next time. Doubt I’ll find it for $0.99 again though.

IMG_2922

***This review was my idea and I was not compensated by Betty Crocker or any one else. ***
Pin It

New Year’s Eve Champagne Cupcakes

Posted on

Happy New Year everyone!

It is a time for resolutions, new beginnings, and nursing your hangover from last night’s party! If you didn’t already have more than your share of champagne for the year, you’ve got to try out these fancy champagne cupcakes.

This endeavor was full of firsts for me. It was the first time making cupcakes with alcohol and the first time I measured all my dry ingredients using a kitchen scale instead of measuring cups. I’ve learned that measuring by weight is much more accurate. I’ll have a video explaining how to measure flour by weight up soon if you don’t already know how to do it.

I found the recipe for the cake and frosting at Gimme Some Oven last week and thought these cupcakes would be a great addition to the fancy pajama party my friends throw for New Year’s Eve each year. I followed the recipe from Gimme Some Oven exactly and they came out pretty good. The frosting is very sweet but the cakes are light and compliment it well. I wish the champagne flavor was more apparent in these cupcakes, but they still taste great regardless.

For decorating these babies, I wanted to do something elegant. I found a tutorial for making 4th of July sparkler cupcake picks from Two Shades of Pink and modified it for my New Year’s Eve theme. Instead of using wooden skewers (I had difficulty finding them), I used those little coffee stirrer straws. Color-wise the stirrers went with my color scheme better anyway. I found that I needed to use a little hot glue to shape them more because tying them in the middle with a string didn’t poof them into a bursting shape very well.

To make the champagne topper, I used some scrap card stock in green and red and a wrapper from a white chocolate Lindor truffle. I marked out a bottle shape on the green paper and then used bits and pieces of the candy wrapper for the foil accents and label. For a little extra touch I cut a little tiny band out of the red paper and glued it over the foil on the neck of the bottle.

To make these cupcakes really sparkle, I hot glued some rhinestone ribbon around the tops of the cupcake liners after they were done baking. One thing I learned from this is make sure to get all of the hot glue strings off of the cupcakes before you frost them. They are tricky to find.

Have a wonderful new year! Did you do anything fun for New Year’s Eve?

Pin It

A Halloween Treat: Maggot and Worm Cupcakes

Posted on

Happy Halloween folks! Creep out your friends and family with these simple but gross maggot and worm cupcakes! I’m not kidding, they were easy to make. This was my first time working with fondant and it was pretty fun. It’s like sugar clay.

I’ve had a lot going on lately what with moving and Halloween costumes, so I planned to make some quick cupcakes for the Halloween party I went to. I found an awesome recipe for a doctored chocolate cake mix from My Baking Addiction. She fancied up a regular ol’ box of chocolate cake mix into something moist and delicious. Check out her website for the recipe!

For the frosting, I used Savory Sweet Life’s Chocolate Buttercream Frosting recipe. I love this frosting because it’s chocolately, not too sweet, and tastes great with chocolate cake.

You could put these creepy cupcake toppers on any type of cupcake though. It’s not difficult to make them either. I chose to go the store-bought route with my fondant this time since I’d never used it before. Some people suggested I make marshmallow fondant. Maybe next time.

If you start with white fondant, color the fondant a little bit at a time with gel or icing dyes. Liquid food coloring might thin out the fondant too much. Gel-like coloring is best. I added the coloring to the fondant with a toothpick and kneaded it until the color was uniform.

Make the shapes for your maggots and worms just like you would when you were a kid playing with clay. I flattened out a separate piece of fondant for the band on the worm and attached it after I had rolled out the worm’s body.

Clay tools are handy when sculpting fondant. I have this basic set I found on Amazon.

I used a small tool that I could easily make impressions on the fondant to create the ring indentations on the worms and maggots. If the fondant gets sticky from the moisture on your hands, have a little powdered sugar on hand to sprinkle on the fondant and your hands to dry it up.

Press your tool into the fondant all the way around the worms and maggots. I drew some features on the maggots with a food marker too.

To make them even more realistic, I made a sugary glaze to brush on top of the maggots and worms once I had placed them on the cupcakes. The glaze recipe is below.

Sugary Glaze

Ingredients

  • 1/4 cup sugar
  • 1 tbs cornstarch
  • 1/2 cup water
  • 1 tbs corn syrup

Instructions

  1. Bring the sugar and 1/2 of the water (1/4 cup) to a boil.
  2. Dissolve the cornstarch in the remaining water. Add to the boiling water and cook till clear and thick.
  3. Stir in the corn syrup. Bring back to a boil and remove from heat.
  4. Let cool and then brush onto your fondant.

Notes

*If you let it cool too long, the mixture will be come gelatine-like and too thick to spread. *This recipe will make more than enough glaze. You can cut the recipe in half if you want.

https://shaneskillercupcakes.com/2012/10/a-halloween-treat-maggot-and-worm-cupcakes/

Are you making any Halloween treats this year? What about costumes? I love Halloween costumes and I would love to see yours. Post a picture below or on my Facebook page of your spooky treats and costumes.

Have a wonderful, safe, and happy Halloween!

Here’s a peek at my Roy Lichtenstein comic book girl costume.

By the way, don’t forget to enter my giveaway for a copy of Lily Vanilli’s A Zombie Ate My Cupcake. Giveaway ends Oct. 31st!

Pin It

Just in Time for Halloween: A Giveaway!

Posted on

Ok, I’ve been neglecting the blog recently. Sorry about that. I’ve been moving to a new house and totally uninterested in baking. You know how it can get. BUT it is Halloween month and it’s my favorite time of the year, so I had to do something special for it. Later this week I’ll be making some creepy Halloween themed cupcakes so keep an eye out for that.

Today though, you have a chance to win a copy of Lily Vanilli’s A Zombie Ate My Cupcake! Yay! It features such treats as Shattered Glass Cupcakes, Zombie Hands Cupcakes, and the awesome Bleeding Hearts Cupcakes. Enter through the Rafflecopter widget below.

Rules:

You must be 18 or older to enter. This giveaway is only available to people in the US. I’ll be sending the book to the winner myself and can’t afford shipping out of the country.

a Rafflecopter giveaway

*I was not compensated for this post.

Related Posts Plugin for WordPress, Blogger...Pin It